- Brainode's Newsletter
- Posts
- How to Create Product Reference Images — From Prompt to Final Visual with Brainode
How to Create Product Reference Images — From Prompt to Final Visual with Brainode
Brainode | Newsletter
May 09, 2025
In this How-To Series, we’ll walk you through the exact steps to create professional, reference-ready product images using Brainode. Whether you’re a designer, founder, or creator, this guide shows you how to go from a simple idea or sketch to polished visuals you can use for branding, mockups, or prototyping—without needing a camera or a studio.
🧠 Step 1: Upload Your Product Reference Image to a Node Block

Before we can start generating anything, we first need to upload a reference image of the real product. For this demo, we’ll be using a perfume bottle as our example.
✅ Here's how to do it:
Create a New Node Block
On your Brainode workspace, click the “+” (plus) icon to create a new Node Block.
Think of Node Blocks as creative containers within your mind map.
Click “Create Image”
Inside the new node, click on the “Create Image” button.
This brings up the image generation and upload options.
Upload the Real Product Image
Click the “+” icon again and select “Upload to Editor.”
Choose the real product image (in this case, our perfume photo) from your device.
🧠 Quick Tip: What’s the Difference Between Upload Types?
Temporary Image Upload:
Uploading a reference image directly via the generation panel makes it a temporary reference—usable only for that generation session.Add Image to Editor:
This saves the image permanently inside your Brainode mind map. While it’s not a direct reference by default, it can be used as one by connecting this node to a new block.
🔗 Once uploaded to the editor, you can now use this image across any new blocks by referencing it in your creative flow.
📝 Step 2: Write and Save a Creative Prompt Using the Content Editor

Once your reference image is uploaded, it's time to start crafting ideas for your ad visuals.
✅ Here's how to do it:
Create a New Node Block
Click the “+” icon to add a new block to your mind map.
This block will be used to write and store your prompt or creative script.
Open the Content Editor
Use the “Content Editor” command inside the new block.
This tool is meant for writing and saving text-based content—not for prompting image generations directly.
🧠 Note: The Content Editor does not trigger image generation.
It’s used to store written content like image prompts, scripts, notes, or planning documents directly into your workspace (mind map).
Write a Descriptive Prompt or Idea
Type out a clear, creative image prompt or script idea related to your product (e.g., a luxury perfume ad concept).
This helps you keep your creative direction organized.
Save It for Later Use
The prompt you save here can be used in the next step when generating your actual ad image.
Having it stored in your mind map keeps your workflow structured and easy to follow.
Next, copy the prompt from your content block and paste it into the “Create Image” prompt input field. Then, select your desired image options—such as camera angle, color palette, style, and aspect ratio. These settings help fine-tune the final output based on your creative direction.For this demo, we’ll choose:
Style: Photorealistic
Aspect Ratio: 16:9
Other Settings: Left on auto (since our prompt is already detailed)
Once you've set your preferences, hit Generate, and you’ll see the results appear below.
PROMPT: The scene unfolds in a sunlit, elegantly designed room, adorned with soft, flowing fabrics and delicate floral arrangements. At the center, a stunning perfume bottle, glistening with a hint of gold, rests on a marble pedestal. The camera gradually zooms in, capturing the intricate details of the bottle’s design, while soft music plays in the background, establishing a luxurious ambiance. The light reflects off the glass, creating a mesmerizing display of colors that dance throughout the room. A hand gently lifts the bottle, and the camera shifts focus to the subtle, alluring fragrance notes wafting through the air, epitomizing elegance and sophistication. REMOVE THE "YOUR IMAGE HERE" FROM THE PERFUME LABEL
👩🎤 Step 3: Generate an Actress to Feature in the Scene
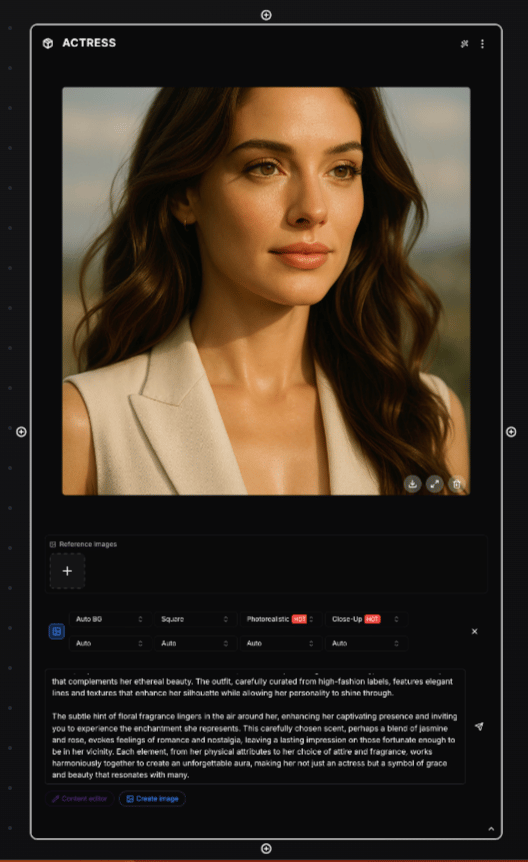
Now, let’s take it a step further by adding a character to the scene.
To do this, we’ll create a new block where we’ll generate an actress to feature in the ad alongside the perfume.
Start by writing a new image prompt in a fresh node block—this time focusing on the appearance, pose, and mood of the actress. You can describe her clothing, facial expression, camera angle, lighting, and how she should interact with the product (e.g., holding the perfume or standing beside it).
Once the prompt is ready:
Paste it into the “Create Image” input.
Choose relevant settings to optimize the close-up reference quality:
Style: Photorealistic
Framing: Close-Up
Format: Square (1:1)
These settings will help capture sharp facial features, makeup, texture, and expression—ideal for using the actress as a high-quality reference in your final ad composition.

🧩 Step 4: Combine the Actress and Product References into a New Scene
Now that we have both the perfume reference image and the actress image, it’s time to bring them together into one cohesive visual.

✅ Here's how to do it:
Create a New Node Block
Click the “+” icon to add a new block to your mind map.
Connect Both Reference Blocks
Drag lines from the perfume block and the actress block into this new node.
Brainode will automatically recognize and attach both reference images to the new block.
Write a Scene Prompt
In this new block, write a detailed prompt that describes the final image scene—this will combine both elements.
For example:
“A stylish woman poses gracefully, holding a luxury perfume bottle in one hand. The background is softly lit, with a minimal studio aesthetic. Focus on elegance, beauty, and product placement.”
Generate the Combined Image
Paste the prompt into the Create Image field, select your desired settings (e.g., Photorealistic, Medium Shot, 16:9), and generate the final ad composition.
You’ve now created a fully composed product scene using your custom-built references—ready for use in mockups, campaigns, or creative decks.


🎬 Want to Take It a Step Further?
While Brainode doesn’t support video generation just yet, you can export your final image and use it as a foundation for animated content in your favorite video editing tools—or keep it for client presentations, ad mockups, or creative decks.
🚧 Video generation is coming soon to Brainode!
You’ll soon be able to turn your static scenes into dynamic, short-form videos directly from your mind map.
In the meantime, feel free to check out an example below of how exported images like these can be transformed into engaging ad-style videos 👇

✅ And That’s It!
This was a quick How-To Series to help you understand how to connect blocks, generate images from references, and combine multiple visuals into a single, cohesive final image using Brainode.
In this example, we focused on creating an ad for a perfume product, but this workflow can be applied to many creative use cases—like:
Character design for games or comics
Storyboarding for video or animation
Fashion concept development
Packaging mockups
Moodboards and visual storytelling
Web and product UI references
Whether you're prototyping, pitching, or building full campaigns, Brainode gives you the flexibility to design smarter—using logic, structure, and AI to streamline your creative flow.
🎁 Try it yourself
Unlock the full image generation experience with a premium subscription, and get 100% off your first month using the code: PREMIUM-PROMO
👉 Head over to Brainode.ai and start creating now.
📚 See you in the next tutorial—where we’ll go even deeper into advanced scene building, storytelling flows, and creative automation with Brainode.
P.S.
The banner at the top of this guide was created using Brainode as well—just another example of how reference-based workflows can come together seamlessly.

🎬 Bonus: Watch How Brainode Compares to GPT
Although Brainode uses several powerful models behind the scenes — including GPT — what really sets it apart is the structure.
Instead of isolated prompts and disconnected results, Brainode lets you build logic-driven visual flows, connect reference images, and create consistent outputs that follow a clear creative direction. This not only speeds up the process — it gives you more control and better results, especially for things like product ads, character design, or concept development.
We made a quick video breaking this down: